9 Winterization Tasks — Fall/Winter Home Comfort Guide
Enjoy reading the latest DIY articles and saving money?
Receive our latest helpful hints, tricks and savings, directly to your inbox.
Posted June 1, 2017
It took a while, but temperatures are finally dropping, and dropping fast. If you haven’t already started to use your home heating systems, you will soon. In order to make sure you have an efficient and effective machine to keep you warm, you’ll want to conduct proper HVAC maintenance and reduce the strain you put on it.
The best way to ensure a functional central heating system is to conduct winterization tasks in the fall, such as increasing insulation levels throughout the home. Not only has your furnace been lying dormant for months, but your gutters and outdoor condenser have also accumulated debris.
Do these fall winterization tasks now and save hundreds of dollars over the heating season:
1. Schedule Heating Maintenance
The number one thing you should do to lower your energy bills and increase your comfort for winter is to schedule professional maintenance in the fall. We’re not just saying this because we are a heating and air conditioning company. It’s actually really important. So important in fact that your manufacturer’s warranty may actually require it.
That’s right. If you neglect annual HVAC maintenance, you may no longer qualify for any fancy warranties that you thought you had. This can be an ugly surprise for many homeowners when their HVAC equipment eventually breaks down.
For your convenience, peace of mind, and wallet, we offer 2 complimentary HVAC tune-ups per year as part of our The Happy Hiller Club (only $8.25/month). We highly recommend signing up for a home maintenance plan such as this so you never have to remember to call your HVAC technician for annual tune-ups.
2. Conduct Your Own Heating Maintenance
In addition to scheduling professional maintenance every year, it’s also important to conduct a little maintenance of your own. This is mainly remembering to change your air filter every 30-90 days, but if you really want to supplement the professional’s work, you can:
- Clean and vacuum around the indoor air handler.
- Clear grass clippings and other debris around the outdoor heat pump/condenser unit.
- Maintain your condensate drain line.
- Inspect air ducts for leaks and cleanliness.
- Wipe down all grill plates.
- Insulate around the home and where wires, pipes, and other utility lines enter the building.
- Test smoke and carbon monoxide detectors every 30 days!
Don’t forget to change your air filter every 30 days or so. If you have poor indoor air quality or household members who easily get sick, you may want to upgrade your air filter.
There are many different air filters available to you. Click here for information on choosing the right air filter for your needs.
3. Inspect Home for Moisture Issues
Steps 3 & 4 should really go together. While you are inspecting your home for moisture issues, you should also be on the look out for insulation insufficiencies. Often the latter causes the former.
- Conduct a visual inspection of your roof and call a roofing professional if necessary. We recommend scheduling a professional roof inspection every 3-5 years.
- If you notice wet or damp insulation in the attic, that is a big sign that your roof could be leaking. Don’t ignore this—call a pro.
- Moldy and rotting attic floor joists and rafter indicate major moisture problems.
- Ice dams forming on the edges or eaves of your roof indicate an insulation or moisture problem. Talk to your HVAC or roofing professional for solutions to your ice dam problem.
- Inspect your drainage system, including gutters, canales, downspouts, siding, fascias, soffits, foundation, roof, and basement. You want to make sure that water is being diverted as far away from the home as possible.
- Inspect plumbing system for leaks and learn how to find and shut off the main water valve in the case of an emergency.
- Learn how to detect and prevent the buildup of mold and mildew in the home (especially wet areas like kitchens and bathrooms).
If you notice any moisture issues around the home, it is extremely important that you address them as soon as you can. Ignoring moisture issues can cause serious safety concerns, especially if any wires are in contact with wet insulation. If you have recessed lights, be extra careful about moisture problems in the attic.
4. Locate Air Leaks and Add Insulation
Insulation helps to slow down the transfer of heat in and out of your home. Generally, we start paying attention to our home’s insulation in the winter when we feel it (or the lack of it) most. But insulation improvements will help you save energy and money year round.
If your attic has sufficient insulation, you may want to check your basement, windows, and doors. Almost every building could use some insulation upgrades.
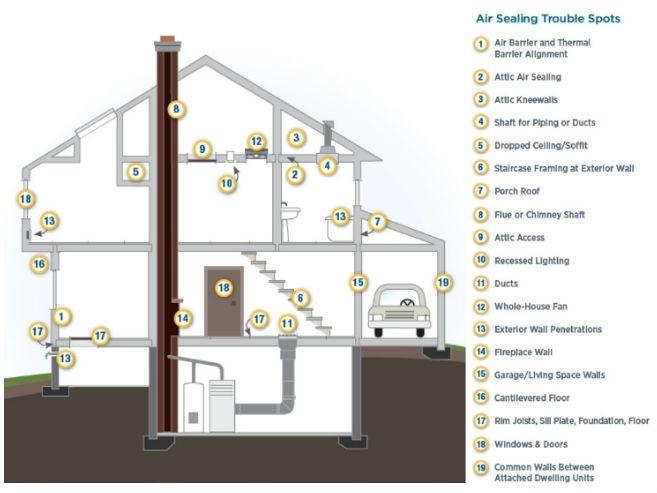
Here are the areas in the home that are prone to air leaks:
 Source: energy.gov
- Behind Kneewalls
- Attic Hatch
- Soffits and Soffit Vents
- Rafter Vent
- Air Ducts
- Plumbing Vents
- Electric Wiring Holes
- Recessed Lights
- Furnace Flue
- Chimney
- Rim Joints
- Windows and Doors
You can test for air leaks by holding up an incense stick or thin piece of toilet paper and observing if there is any air movement or not.
Air Sealing and Insulation Advice:
- You can probably make the most difference by adding insulation to your attic and basement. Adding attic insulation isn’t too difficult, but prepare for a dirty job that requires planning (A Do-It-Yourself Guide to Attic Insulation).
- Check the R-value of your attic insulation with a measuring stick. Learn how to determine the proper R-value insulation you need with the EPA’s Insulation Fact Sheet.
- Sealing air leaks and adding insulation to the attic will not only lower your monthly energy bills, but it might also solve other heating-related problems as well, such as drafty rooms, uneven temperatures, and ice dams.
- Sealing air leaks and adding insulation to the basement will also help lower energy bills, in addition to helping with cold floors and pest problems.
- Inspect your air duct system and seal duct leaks and add insulation as necessary.
- Check the insulation levels in your walls.
- Check for air leaks around doors and windows and replace old caulk and weatherstripping.
- Use draft snakes (or a rolled up towel) to block drafts underneath doors.
- Consider adding an insulation blanket around your water heater.
We also recommend insulating your pipes, which can help prevent frozen pipes from causing a lot of damage to your home. Most hardware stores will have pre-cut foam strips that can easily be slipped on over hot and cold water pipes.
Don’t start thinking about frozen pipes when it’s already too late. Learn how to prevent frozen pipes before they happen!
Source: A Do-It-Yourself Guide to Sealing And Insulating With EnergyStar.
5. Clean Your Gutters
It’s highly recommended that you clean your gutters every 3-6 months, at least once in the spring and once in the fall. When leaves and other debris form in the gutters, water can run down the siding and cause damage to your home and foundation.
As with many things in life, most people know they should periodically clean their gutters, but few actually do.
Watch this video to learn how to clean gutters and downspouts and (make sure you have a spotter by the ladder and thick work gloves):
You can also hire someone to clean out your gutters for you but expect to pay around $175.
If you have loose gutters, downspouts that aren’t long enough, or want to install gutter guards, check out this Family Handyman article, “Easy Gutter Fixes.”
6. Trim Overhanging Trees
With winter comes snow and ice, which puts a lot of pressure on weak trim limbs. This is not only a huge safety hazard, but also causes millions of dollars worth of property damage every year.
Get peace of mind for the winter season by having a professional tree cutter trim weak and overhanging tree limbs before the snowstorms come. While the tree guy is there, he’ll also be able to check the health of all your large trees so you can avoid knocked out power lines, crushed vehicles, or even worse.
7. Install and Set a Programmable Thermostat
If you don’t have a programmable thermostat already, what are you waiting for? They are cheaper than ever and can save you around 10% every year on your heating and cooling costs.
There are a variety of options available to you, including digital, wireless, and “smart.” Give Hiller a call and we’ll be happy to walk you through all of your options and perform a quick and thorough thermostat installation.
Here are some thermostat tips for saving energy this fall/winter:
- When you are at home, set the thermostat to the lowest temperature possible, where you are still comfortable.
- When you go to bed or leave the house, turn the thermostat back around 10-15°F for the time you will be away or asleep.
- Learn how to use your programmable thermostat for maximum savings.
- To aid your purchase decision, use thisThermostat Guide from Consumer Reports.
8. Window Treatments
Take advantage of the natural heat from the sun by opening up your windows during the day. Close them at night and use heavy, insulating blinds and draperies if you can.
You may also want to consider installing storm windows, which can reduce winter heat loss by as much as 50%. Replacing your windows can be expensive but will pay for itself (and then some) over its lifespan.
For a cheaper alternative, you can use window insulating film.
9. Home Heating Hacks
- Remove any window A/C units, clean them, and find a warm, dry place to store them for the winter.
- Turn down your water heater temperature to 120 degrees. Click here for more 9 more water heating tips.
- Set your thermostat to the lowest temperature you feel comfortable. Put on a sweater.
- Reverse the direction of your ceiling fans to blow warm air near the ceiling downwards.
- Humidity plays an important role in temperature perception, comfort, and health and wellbeing. Learn about the importance of whole-home humidification systems.
- Check the fireplace flue damper and make sure it forms a proper seal. Always have the damper closed when the fireplace is not in use. If you don’t use your chimney often, consider using a “chimney balloon” or sealing the chimney flue.
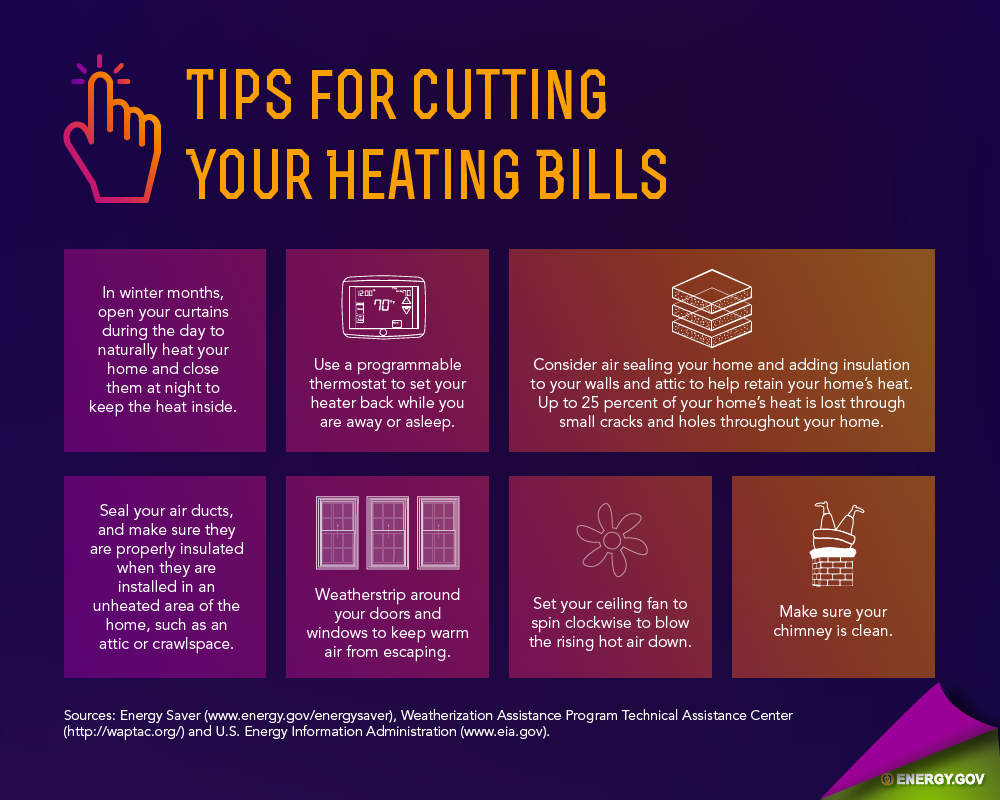
Source: energy.gov
More Department of Energy tips for fall and winter savings can be found here.
 Daily Promotion
0% Interest for 12 Months on Select New Tankless Water Heater
Purchase Select New Tankless Water Heater & Receive 0% Interest for 12 Months. Click below to see financing terms.
Get Promotion
